Congratulations! You're one step closer to getting your own slice of tactical action with an ARMA Reforger server! For those of you who don't have one, or want to skip the boring setup parts of getting the application running - click here to get your own ARMA Reforger server!
Note - The following are noted issues with Arma Reforger servers as of May 2022. These issues will appear on all servers until there are hotfixes:
- The server will encounter memory leaks that increase over time, ballooning from an original 3GB bootup allocation.
- The server will disconnect players at random times, and not allow players back into the server.
- The server will use a lot of bandwidth per player, causing issues with bandwidth caps over time.
- Servers require regular restarts (At least once a day, if not multiple times a day) to avoid bugs and other ingame issues including player joins.
Navigating our control panel can be a bit daunting at first, but once you get the hang of it it's really simple - when you first login to the control panel, you'll be greeted with the screen below:

Here we can see your new server instance! The "Server Name" can be set in one of the later menus, and clicking on it allows you to see more information about your server. From this main menu page, we have a Status/On/Off button you can use to quickly change the status of your server (Yellow is off, Green is on, click to change states), as well as a Management dropdown (the Blue Wrench button). Additionally we can see the IP and Port of your new server. To continue, lets click on the server's name - in this case, ArmA 3 - Linux - 2312 (Don't worry about the name - it's just within the panel, not ingame)
Once we're into the server management page, we're greeted with a screen like the below. We've highlighted some areas you'll want to pay attention to:
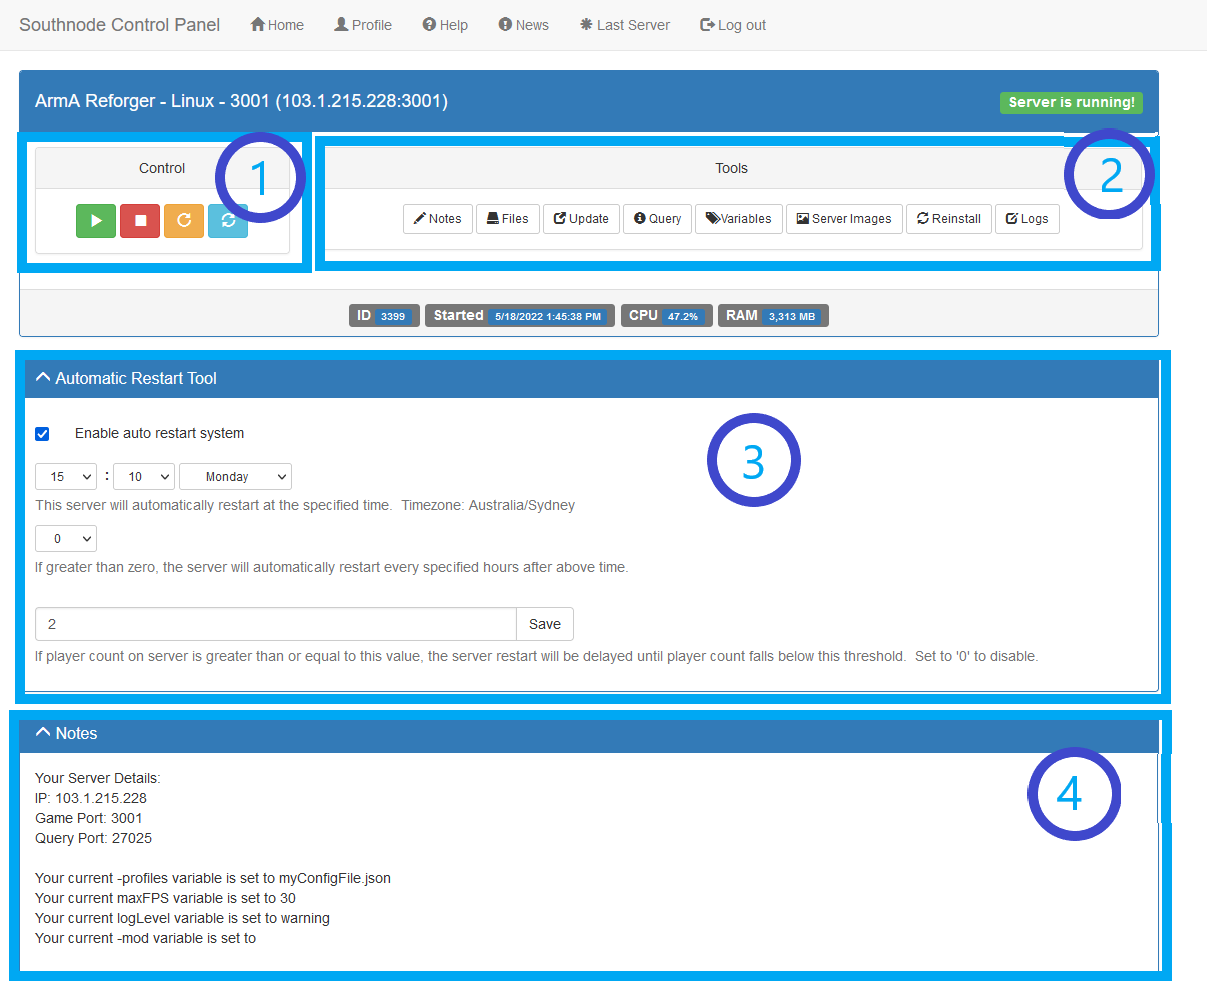
Here we can see the following areas highlighted:
- The control area - this is where you can turn your server On (Green play button), turn the server off (Red stop button), restart the server (Yellow replay button) or refresh the status page (Light blue recycle button).
- The tools area - this is where various different settings, console readouts and other configuration options are held. This includes (among other things) the Variables page where we set our mods and other commandline settings, and the File tool where we can edit the configuration files for the server. We'll detail these 2 menus in detail below, but feel free to click and find out what things do (We recommend you do not click Reinstall unless you have completely broken it).
Special note - Variables: When entering the Variables tool for the first time you are greeted with the following outlay: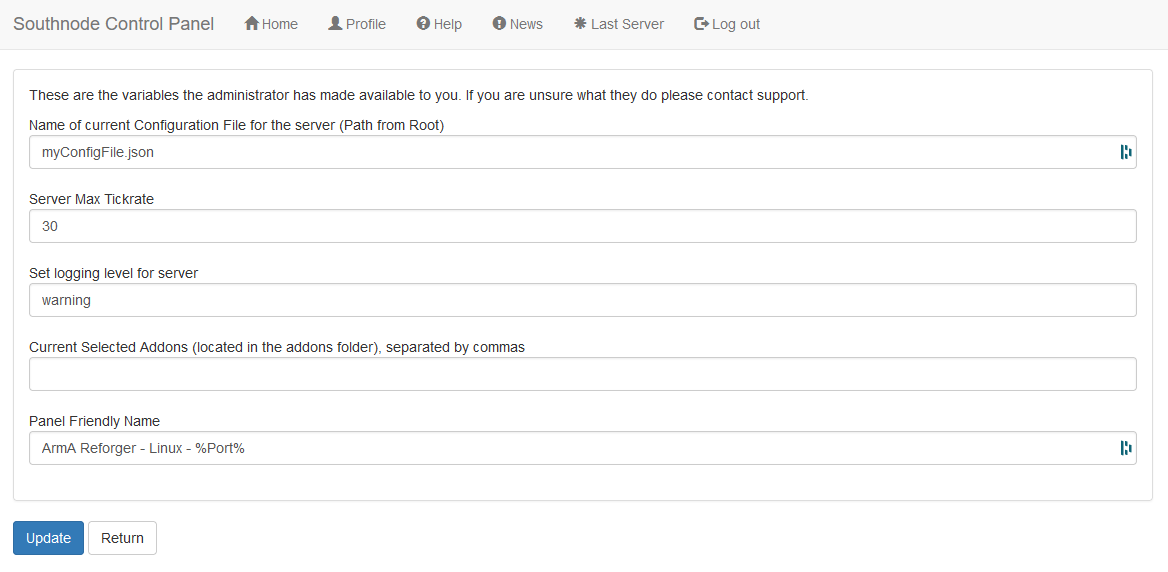
Here we can see the following options:
Name of the current Configuration File: we recommend leaving this as the default, and changing your configuration from within that file for ease of use, however if you wish to have multiple configuration files to swap between, merely create a new one within the Files Tool in the root of your server, and then state the name of it here (Note: it is CASE-SensItiVE)
Server Max Tickrate: for stability we recommend leaving this at the default of 30 - however if you are looking for a more responsive server increasing this to 60 or so can be beneficial - note you may incur stuttering as a result.
Set logging level for server: CURRENTLY USELESS
Current Selected Addons - this is a comma separated list of mod GUID's that the server will load from the addons folder (You can upload mods to the server via the inbuilt FTP server for the node - details on how to do that are located here: https://southnode.net/knowledgebase/6/5.-Getting-Files-in-and-out-of-your-Server.html
If you want to give the server a recognisable name within the control panel for ease of access, you can set this under the Panel Friendly Name variable.
Special note: Files
Southnode includes file access to your server and its folder structure. Here we can see the base files installed for the ArmA Reforger server in its entirety (note that the CrashReporter is an application, not a crash log), including the initial install config file "myConfigFile.json":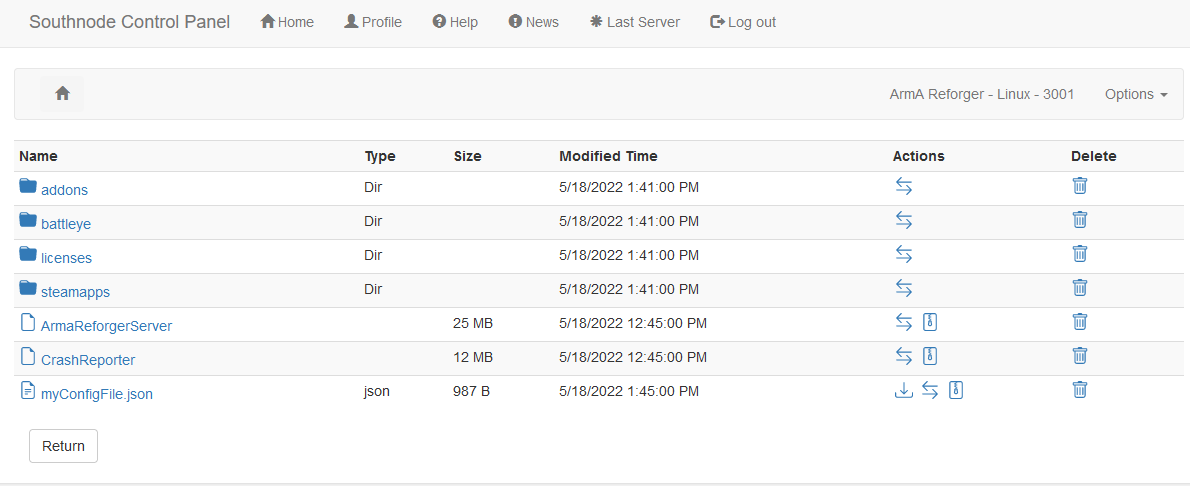
Within this file browser we can then click on our "myConfigFile.json" and edit the configuration for the server - note for customers of Southnode we do not recommend changing any IP addresses or Ports, however there is plenty in there to change around to suit your needs. Configuration options are all detailed by BI on https://community.bistudio.com/wiki/Arma_Reforger:Server_Hosting#Configuration
- The scheduled restart area - we recommend setting your server to restart at specific times outside of your standard play periods (ie. early in the morning) to make sure your server is performing optimally - memory leaks can start occurring in the program if the server has a long uptime, and restarting avoids this. You can also stipulate if you wish your server to restart x hours after the last (such as if you want a 4 hourly restart) (set to 0 to only restart at the specific time at the top), and also stipulate if you don't wish for the server to restart if it has x amount of players on it (Player Grace - set to 0 to disable and restart regardless of player count). Make sure you have set the timezone within your Profile in the Profile menu at the top of the screen - this restart is done in THAT timezone!
- Server Notes - this is where the IP address, Port values, and variables are set for your server. This is a quick reference for you to see your server's ports for when you need to connect, or need to link Battlemetrics or another tool.
Your server is provisioned in such a way that without any configuration it will start without a hitch - any configuration you do will need to adhere to how BI want their servers to be configured in the .json file specified as the Current Configuration file. We recommend reading up on https://community.bistudio.com/wiki/Arma_Reforger:Server_Hosting#Configuration for the main myConfigFile.json file to get started quickly!
Admin's Note: The server currently does not support a logging to file function - as such we have created a "Console" capability to see the output of the server. Make your changes one at a time to avoid breaking the configuration, and causing your server not to start. Make sure to maintain all talking marks "" and commas , exactly where they are within each line - otherwise, you may break the config, and cause your server not to start. Use the Console capability to check on issues causing the server to crash.
